MFP Connect adds a ChronoScan button to the touch screen of the multifunction printers (MFPs) of the office. The user presses it, chooses what to scan, fills in the index fields on the device screen and scans. The scan arrives in ChronoScan as a new batch with the index data already attached, and it is processed and exported like any hot folder batch.
Applies to ChronoScan Capture 32 or 64 bit with the MFP Connect plug-in (November 2026). This chapter is also the installation and configuration guide: it follows the order of a new installation.
Two pieces are installed on the ChronoScan server:
MFP Capture tab in ChronoScan Capture: where the machines and the capture configurations are managed and the generated batches are monitored.
ChronoScan MFP service (ChronoScan_MFP): a Windows service that serves the application shown on the device screen and receives the scanned documents. The devices connect to it over the network on port 8580.
Nothing is installed on the MFPs: ChronoScan registers its application on each device, and the device only stores the address of the ChronoScan server. The integration is vendor-neutral: each manufacturer is a driver of the same service. Today it supports Xerox AltaLink and VersaLink devices through the Xerox Extensible Interface Platform (EIP).
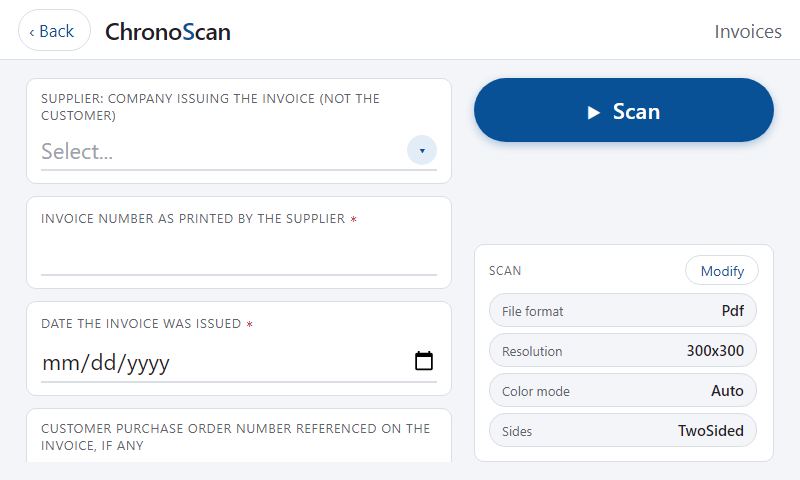
A capture configuration on the device screen: the job fields on the left, the Scan button and the scan settings the user may change on the right.
How a scan travels
The user presses the ChronoScan button on the device home screen. The device opens the panel application served by the ChronoScan MFP service and shows the capture configurations available on that machine.
The user chooses a configuration and fills in the index fields. The panel checks the required fields and the validation rules of the job with ChronoScan before scanning: a wrong value is refused on the device.
The device scans with the settings of the configuration and sends the file (PDF, TIFF or JPEG) to the service together with the index data.
The service creates the batch in the job with the index values already in the fields, and queues it for the ChronoScan hot folder engine. On Enterprise jobs the processing server takes the batch from there.
The hot folder engine processes and exports the batch with the operations configured for the job, exactly as a hot folder batch. The Batches generated list of the MFP Capture tab follows the batch through those stages.
The panel application is shown in the language ChronoScan is set to on the server (not the language of the device), with the same translations as ChronoScan. The language is read when the service starts: after changing it in ChronoScan, stop and start the service. The titles and descriptions of the configurations and the names of the fields are shown as they were written.
Requirements
A ChronoScan Capture Advanced or Enterprise license. MFP Connect is not available with the PRO edition: the MFP Capture tab does not appear and the service refuses the devices with a license message. See Licenses, HUB and credits.
ChronoScan Capture installed on a Windows server (or workstation) that is always on. The hot folder engine of this installation processes the batches, so it has to be running; see HotFolder Tasks.
Port 8580/TCP reachable from the MFPs. The installer adds the Windows Firewall rule; if there are other firewalls between the devices and the server, open the port there as well.
Preferably a server name that the MFPs can resolve by DNS (for example http://chronoscan-srv:8580). An IP address also works, but it gets stored on every device, so a later IP change means registering all machines again.
Xerox devices
Xerox AltaLink or VersaLink with EIP (Extensible Interface Platform) 3.0 or later; 4.2 or later is recommended. Test connection shows the model and the EIP version of each device.
On a device older than EIP 4.2 the ChronoScan screens run on the older browser of the device. They look and work the same, with two differences: dates are typed instead of chosen from a calendar, and the lists are moved by dragging them or with their scrollbar. A device older than EIP 4.1 scans through its older scan service; nothing changes for the user.
The device administrator user and password (by default admin).
In the device web interface (Properties > General Setup > Extensible Service Setup; names vary by model): Extensible Service Registration enabled (the EIP registration web service), Enable the Extensible Services Browser (on some models "Custom Services Browser") and Display Custom Services Selection enabled. On many devices the browser is off by default.
Date and time set correctly on the device. Registration is signed with a timestamp and fails if the device clock is far off.
If the device runs an older firmware, a reboot after changing those settings may be needed before the application appears.
Adding and registering the machines: the Machine dialog, Test connection (model and EIP version of the device) and Register, the machines list.
Capture configurations: title, description and icon of the button, job, batch name, hot folder processing, scan settings per device type, fields on the device.