13.1. Installing the plug-in and registering the service
Installing the plug-in
The MFP Connect files (the plug-in, the service and the panel application) come with every ChronoScan Capture setup from version 1.0.4.22, so they are always up to date with ChronoScan. What turns them on is the ChronoScan MFP Connect setup, run once on the server:
-
-
Run the MFP Connect setup as administrator. There are two, and the one to use is the one that matches the ChronoScan installation on this server: ChronoScanMFPPlugIn.exe for the 32-bit ChronoScan (installed under Program Files (x86)\ChronoScan) or ChronoScanMFPPlugInx64.exe for the 64-bit ChronoScan (Program Files\ChronoScan). It detects the ChronoScan installation folder; keep it unless ChronoScan is installed elsewhere. If ChronoScan is older than 1.0.4.22 it stops with a message: update ChronoScan first.
-
The setup creates the Windows service ChronoScan_MFP (automatic start) and the firewall rule, starts the service and marks this installation as MFP enabled.
-
Open ChronoScan Capture. A new MFP Capture tab appears in the ribbon.
The MFP Capture tab: machines, capture configurations and the service.
What each setup leaves on the server:
|
Item
|
Detail
|
|
Plug-in and service files (ChronoScan setup)
|
chrono_mfp.dll in Bin, the service program chrono_mfp_sv.exe and the panel application (webapp) in Bin\ChronoMFP of the ChronoScan installation. Replaced by every ChronoScan update; inert until MFP Connect is enabled.
|
|
Windows service (MFP Connect setup)
|
ChronoScan_MFP ("ChronoScan MFP Connect service"), automatic start, listening on port 8580.
|
|
Firewall rule (MFP Connect setup)
|
"ChronoScan MFP Connect": inbound traffic allowed for the service program.
|
|
MFP enabled mark (MFP Connect setup)
|
A registry value (HKLM\Software\ChronoSCAN\MFP Connect\Installed). ChronoScan shows the MFP Capture tab only where it exists, or where the configuration already has machines (servers set up with the first MFP Connect setups, which carried the files: there the setup does not need to be run again). On any other installation the files shipped with ChronoScan do nothing.
|
Upgrades: just update ChronoScan with its standard setup. It stops the MFP service, replaces the files and starts the service again. The MFP Connect setup does not need to be run again; machines, configurations and batches are kept.
Uninstalling: remove "ChronoScan MFP Connect" from Windows Apps & Features. The service, the firewall rule and the mark are removed and the tab disappears; the files stay with ChronoScan, and the configuration and the logs stay in the ChronoMFP folder of the ChronoScan configuration directory. The ChronoScan application stays registered on the devices until it is removed from their web interface. Uninstalling ChronoScan itself also removes the service.
Registering the service
The service must use the same configuration directory as ChronoScan, so that it finds the jobs. The status line under the machines list tells how it is running:
|
Status line
|
Meaning
|
|
MFP server running as a service on <server> (port 8580)
|
Correct. Nothing to do.
|
|
... not registered as a service on this machine
|
Click Register Service and then Start.
|
|
MFP server stopped
|
Click Start.
|
|
MFP server running as an application
|
Test mode started with Run as application; for production use the service.
|
|
... (Hotfolder engine not detected)
|
The service runs, but no hot folder engine is processing the batches: start the hot folder monitor or the hot folder service (see HotFolder Tasks). The number of batches waiting is shown before it.
|
Register Service (ribbon group Service) creates the Windows service bound to the configuration directory that ChronoScan Capture is using at that moment. Use it after the installation when ChronoScan runs with a custom configuration directory, or whenever that directory changes. It replaces any previous registration of the service. Windows asks for administrator permission.
Start and Stop control the service. Run as application starts the service program in its own console window, for tests: it uses the same configuration directory and port, the batches it creates are real, and it stops when that window is closed.
The status line under the machines list, and the MFP Service Activity log below it. Here the server runs as an application and one batch waits for the hot folder engine.
The MFP Service Activity log below the status line shows what the service is doing: registrations, scan sessions, batches created and errors. It is the first place to look when a scan does not arrive.
Server URL
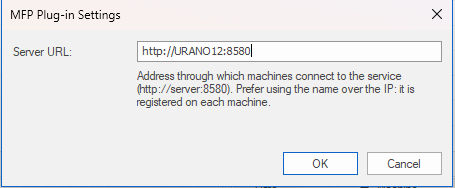
Open Settings and check the Server URL: it is the address the devices will use to reach this server, http://<server name>:8580. It is proposed from the computer name; correct it if the devices should use another name or address. Prefer the name over the IP: it is registered on each machine, and a later IP change means registering all machines again.
Settings: the server URL that is registered on each machine.
The port is part of the service command line (-port:8580) and of the Server URL. If another port has to be used, change both and register the machines again.