×
Menu
Index

3.5.6.2.1. HotFolder Configuration Window

3.5.6.2.1. HotFolder Configuration Window
 
On this window it is possible to edit the settings for a HotFolder Task.
 
1

Activate Configuration

1. Activate Configuration
Enable the Activate Configuration option if you want the HotFolder Task to be active as soon as it is created.
 
2

Configuration Name

2. Configuration Name
Insert the desired name for the HotFolder Task.
 
3

Configuration Job

3. Configuration Job
This dropdown menu shows all available Jobs for the HotFolder Task. Select the Job that suits the documents you will be using.
 
4

Import Module

4. Import Module
The Import Module dropdown menu offers the option to Import Images of PDF files. Select the one that suits the files you will be using.
 
The Import Module dropdown menu.
 
5

Import Configuration

5. Import Configuration
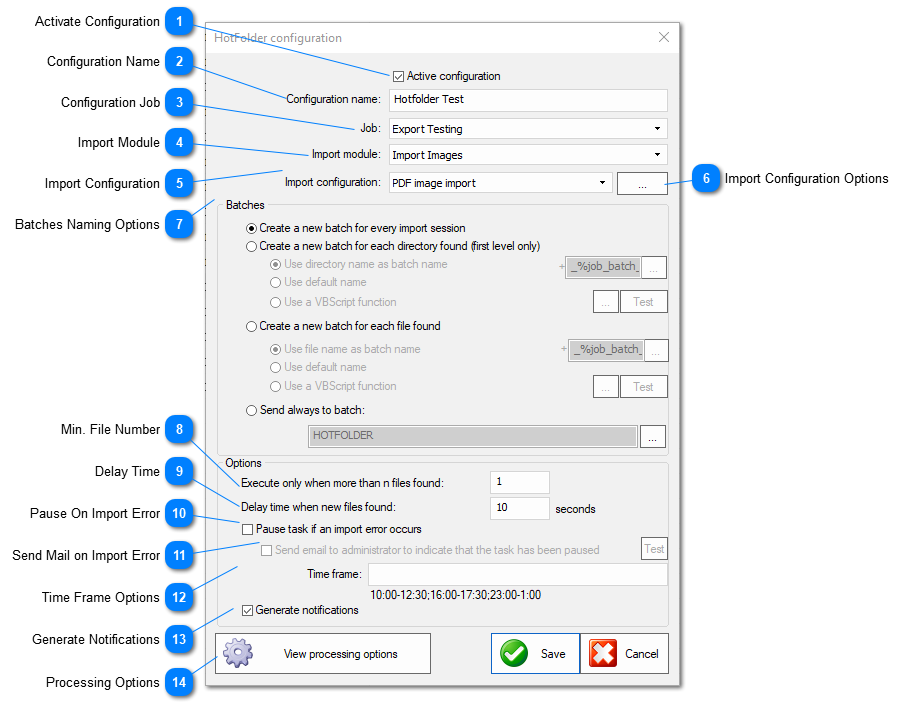
The Import Configuration dropdown menu offers the options for the selected Import Module. The PDF Import Module only have one configuration.
The Image Import Module offers different image options. You can use PDF images, JPG files or TIFF files. Select the one that matches with the files to be processed.
If you need to tweak the settings click on the Import Configuration Options button.
The Import Images Configuration Menu.
 
6

Import Configuration Options

6. Import Configuration Options
The Import Configuration Options button will open up the selected Import Module configuration window.
For PDF files it is the Import PDF Files Input Module and for image files it is the Import Images Input Module.
 
7

Batches Naming Options

7. Batches Naming Options
 
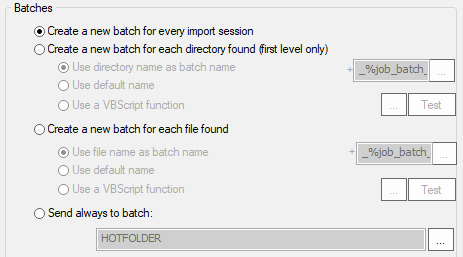
On the Batches Options Panel it is possible to select Batch options for the Task.
  • The create new batch for every import session option will create a new Batch of files every time the specified minimum number of files is detected on the monitored folder.
  • The create new batch for each directory found option will detect new folders instead of files and create a new Batch for every new folder on the monitored folder.
  • You can also choose the naming structure with Batches for each directory and each file found.
  • With the send always to batch option all files will be imported inside the specified Batch.
  • You can either name the Batch manually or use the options button ( ) to open the Variables Wizard Window where you can set up the Batch name using variables.
     
8

Min. File Number

8. Min. File Number
Increase the Minimal File Number to make ChronoScan wait until the value is reached to start the HotFolder Task.
Useful when the files are scanned or being transferred to the monitored folder and the batches have many documents.
 
9

Delay Time

9. Delay Time
The Delay Time is the time ChronoScan will wait until starting a new HotFolder Task.
Useful to make sure all files are on the intended location.
 
10

Pause On Import Error

10. Pause On Import Error
Enabling this option will pause the HotFolder Task when an import error happens.
An import error means that ChronoScan was unable to delete or move a file on the import directory to the /imported directory.
 
11

Send Mail on Import Error

11. Send Mail on Import Error
With the Pause On Import Error option enabled you can also enable the
Send Mail on Import Error to send an e-mail to the Administrator when a HotFolder Task is paused.
The Administrator e-mail can be set on the Configuration Parameters ChronoScan Window via the System Toolbar on the Administration Tab.
 
12

Time Frame Options

12. Time Frame Options
The time frame options will limit the hours of the day in which the Hotfolders will be running.
Leave it empty to run always.
 
13

Generate Notifications

13. Generate Notifications
Deselect that option to suppress the desktop notifications.
 
14

Processing Options

14. Processing Options
The View Processing Options button will open the Tasks & Process Window
where you can setup all the desired tasks for the
HotFolder Task to perform at Import, Processing and Exporting times.