To properly display this page you need a browser with JavaScript support.
×
Menu
Search
1. Table of Contents
2. Minimal System Requirements
3. Articles
3.1. Articles Table of Contents
3.2. ChronoScan Enterprise Workflow
3.2.1. Document Validation Workflow
3.3. How to backup ChronoScan Enterprise
3.3.1. Database Backup
3.3.2. Local Folder Backup
3.4. Masterkey Setups Guide
3.4.1. Converting an Existing Setup to Use Masterkeys
3.5. Capturing Checkboxes and Signature Boxes
3.6. ChronoScan Enterprise Network Diagram
3.7. Adding Users in Bulk
4. Installation of ChronoScan Web Server
4.1. 1. Software Prerequisites
4.2. 2. Step by Step Installation Guide
4.2.1. WCI SQLServer Database Creation
4.2.2. User Access Recommendations
4.3. 3. Running the ChronoScan Main Services
4.3.1. Running Services for Multiple Configurations
4.3.2. Running a ChronoScan Server with SSL
4.3.2.1. Generating Self Signed Test Certificates with OpenSSL
4.3.2.2. Converting Pfx files to wt pem format
4.3.3. Configuration of Additional Processing Servers
4.4. Optimizing You Master Vendor Database
4.5. Database Parameters
4.6. Running ChronoScan Web Server through a Reverse Proxy (IIS)
4.7. Running ChronoScan Web Server through a Reverse Proxy (Helicon APE)
4.8. Using Service Availability Monitoring Tools
5. ChronoScan Web Administrator introduction
5.1. Table of Contents
5.2. ChronoScan Web Main Services Description
5.3. User Roles
5.3.1. User variables
5.3.2. User Permissions
5.4. Jobs & Batches
5.5. Document Types (Document Templates)
5.6. Entities
5.7. Data model templates
5.8. Main Workflow Stages
5.8.1. Document\Batch Creation
5.8.1.1. Batch Creation
5.8.1.2. Installing the Scan Plug-In
5.8.2. Document Pre-Classification
5.8.3. Document Processing
5.8.4. Document Post-Classification
5.8.5. Document Type (Template) Configuration
5.8.5.1. Grid Setup
5.8.5.1.1. Grid Properties
5.8.5.1.2. Column Menu (Master Column)
5.8.5.1.2.1. Advanced OCR for Grid - Data Capture Options
5.8.5.1.2.1.1. Advanced OCR for Grid - OCR Engine Options
5.8.5.2. Trigger Setup
5.8.5.3. Intelli-Tag Setup
5.8.5.4. OCR Zones Setup
5.8.5.4.1. Advanced OCR Reading - Data Capture
5.8.5.4.1.1. Advanced OCR Reading - OCR Engine
5.8.5.4.1.2. Advanced OCR Reading - Linked Triggers
5.8.5.4.1.3. Advanced OCR Reading - Advanced Data Extraction
5.8.6. Batch Indexing
5.8.6.1. Status Icons and Description
5.8.6.2. Data Fields Panel
5.8.6.2.1. Intelli-tag Settings
5.8.6.2.2. Document and Field Settings
5.8.6.3. Grid View
5.8.6.4. Pending Tasks and Document Navigator
5.8.6.5. Keyboard shortcuts
5.8.6.6. Grid Panel
5.8.7. Data Review/Correction
5.8.8. Final approval stage
5.8.8.1. The approval view
5.8.8.2. Export modules for approval workflow Jobs
5.8.9. Document Export
5.9. Notifications
5.10. Web Session Timeout
6. Users Guide - Administrator
6.1. Table of Contents
6.2. Login Window
6.3. Documents Tab
6.3.1. Default Filter Creation
6.3.2. Custom Fields for Documents Reports
6.3.3. History Window
6.4. Batches Tab
6.4.1. Batch Status
6.5. Jobs Tab
6.5.1. Job Settings
6.5.1.1. Configuration
6.5.1.2. Workflow
6.5.1.3. Users
6.5.1.4. Fields
6.5.1.5. Master Keys
6.5.1.6. Document Types
6.5.1.6.1. Set All Existing Document Types as Validated
6.5.1.7. XLS Types
6.5.1.8. Notifications
6.5.1.9. Input
6.5.1.9.1. Hotfolder Automated Input
6.5.1.9.2. IMAP Automated Input
6.5.1.9.2.1. New IMAP Account Window
6.5.1.9.2.2. E-mail Input Rules Window
6.5.1.10. Processing Options
6.5.1.11. Data Entry and Error Correction Options
6.5.1.12. Export Options
6.5.1.13. Stats
6.6. Users Tab
6.6.1. Create New User
6.6.2. Assign Entities to User
6.7. Entities Tab
6.8. Templates Tab (XSD's)
6.9. Reports
6.9.1. Reports 1
6.9.2. Reports 2
6.9.3. Notifications
6.9.4. Processed AP Reports
6.10. Administration Tab
6.11. Description of Status Icons
6.12. Batches Labeling system
7. Users Guide (Operators and Editors)
7.1. Dashboard
7.2. Documents Tab
7.3. Batches Tab
7.4. Manual Batch Creation
7.4.1. Document Scanning
7.4.2. Document Uploading
7.4.2.1. PDF Uploading Options
7.5. Batches Indexing
7.5.1. Data Input Panel
7.5.1.1. Supplier Data View
7.5.1.2. Intelli-Tags View
7.5.1.2.1. Intelli-Tag Settings Window
7.5.1.3. Masterkey Settings
7.5.1.4. Triggers Panel
7.5.2. Data Grid View
7.5.3. Thumbnail View
7.5.4. Document Notes Window
7.5.4.1. Attaching and importing files from the Document notes window
8. Users Guide (Indexer)
8.1. Dashboard
Search
Search
Search
Search
6. Users Guide - Administrator
6.4. Batches Tab
6.4.1. Batch Status
Previous page
Next page
Print version
To properly display this page you need a browser with JavaScript support.
6.4.1. Batch Status
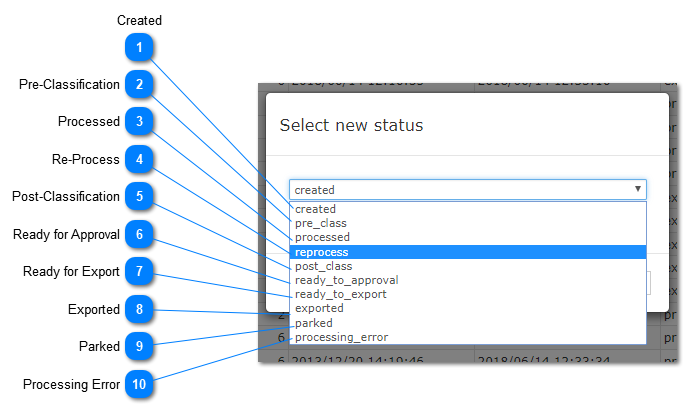
By using the batch statuses the user can manually force a status to the desired Batch.
Created
This is the initial status of any Batch, a created batch will be ready for Pre-Classification.
If that workflow step is not enabled for your Job then the Batch will be processed and will be ready either for indexing or Post-Classification.
Top
Pre-Classification
A batch in the Pre-Classification status will be processed and then moved to either Post-Classification or Indexing steps.
Top
Processed
When a batch is set to Processed it will be ready for Post-Classification if that step is enabled in the Workflow options or ready for indexing and user input.
Top
Re-Process
A batch set to Re-Process will be processed again. Use this status when reprocessing for an entire batch is needed.
Top
Post-Classification
A batch in Post-Classification status is awaiting post-classification.
This only works if the
post-classification step
is enabled on the
job settings
.
Top
Ready for Approval
At this stage the Batch is ready for approval, use this to force validation of a batch and send it straight for approval.
Top
Ready for Export
When the Ready to Export status is set the batch will be exported using the export setting set for that batch and job.
This skips all validation and approval rules. The export will only fail if the job is not set to export invalidated batches.
Top
Exported
Exported batches refers to batches that were already exported.
If you want to hide a batch from users use the parked status instead.
Top
Parked
A parked batch is awaiting further action from the system administrator.
Batches with parked status are hidden to all other users.
Top
Processing Error
Whenever a processing error occurs during the processing step this status will be set to the batch.
It means something prevented the processing server from processing that batch correctly.
Top