5.8.5.4.1. Advanced OCR Reading - Data Capture
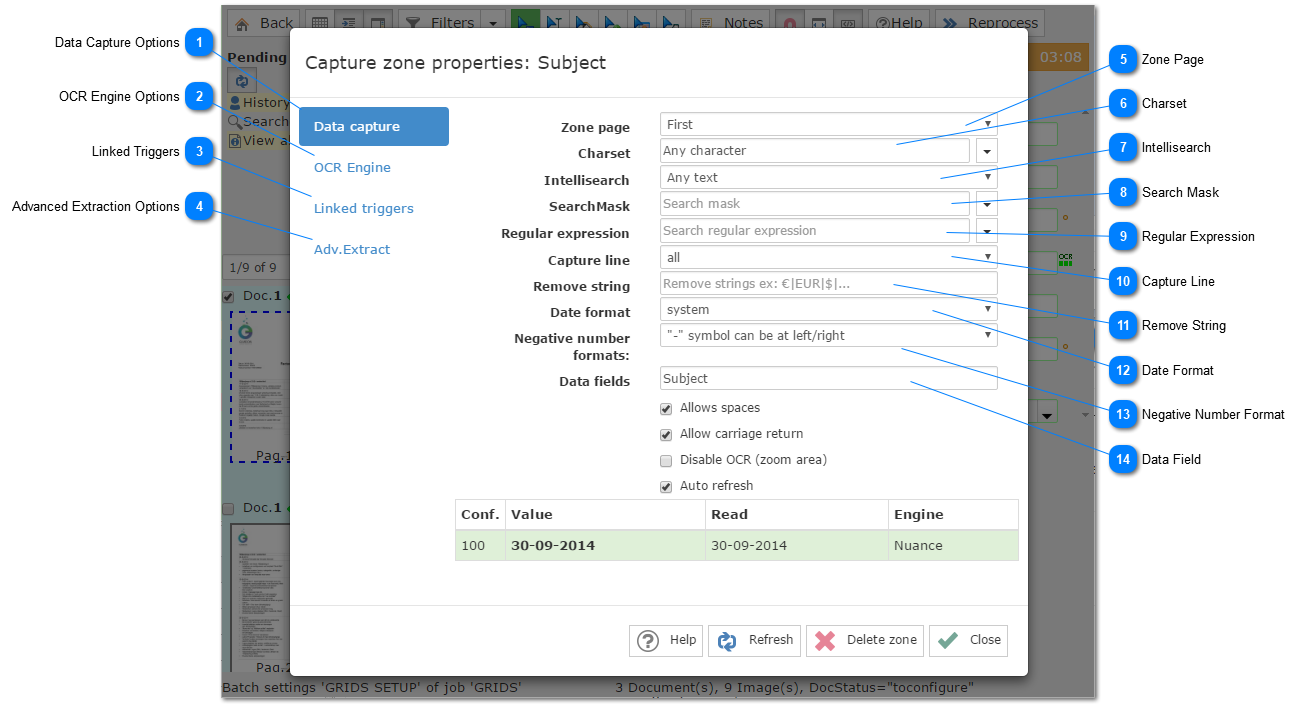
On the Data Capture options tab it is possible to create a series of validation rules for the data being captured. It is possible to restrict the charset for the OCR Engine, set the date format, add a search mask and much more.
 Data Capture OptionsOn the data capture tools tab it is possible to create a set of validation rules for the data being captured by the OCR Zone.
|
 OCR Engine OptionsOCR Engine tools. In that tab it is possible to change the OCR Engine being used to extract OCR data from the current OCR zone and apply basic image processing filters such as auto adjust and dilate.
|
 Linked TriggersLinked Triggers tab. On the Linked Triggers tab it is possible to see and perform actions related to Triggers linked to the current OCR Zone.
It is possible to unlink a trigger and change link settings.
|
 Advanced Extraction OptionsOn the Advanced Data Extraction tab it is possible to create customized data capture rules based on criteria such as line number or character and word position. It is also possible to expand that functionality with VBScripts.
|
 Zone PageThis option will define the page of the document where the OCR Zone will show up.
This setting will be altered by any triggers linked to the OCR Zone.
|
 CharsetUsing the charset option it is possible to restrict the characters that the OCR Engine will be searching for.
This will help reduce bad detection errors. We recommend setting the charset whenever possible.
You can set that field manually and/or use the suggestions on the dropdown menu.
|
 IntellisearchThis option will enable intelligent search for the OCR Zone.
A special filter will be applied looking only for the desired data. If nothing matches the filter the data field will be empty.
If using Search Masks enable them here.
|
 Search MaskA search mask can be created using the search mask option.
The search mask will set default formatting for the field and also fit the captured data into that format.
If no data input into the field matches the search mask the data field will be empty.
To use search masks you must first enable Search Mask on the Intellisearch options.
|
 Regular ExpressionBy using the regular expression option the user can set a regular expression that will be checked against the data being captured.
Only the part of the data that matches the regular expression will be set to the data field.
|
 Capture LineOnly a specific set of lines can be captured from the OCR Zone, use this option to set the desired line number or numbers.
|
 Remove StringAny character or phrase that matches the strings on the remove strings box will be removed from the data field.
|
 Date FormatDate format can be set on this box. This can be used if the date format on the document does not match the system date format.
When there is a date format mismatch the data field will be blank.
|
 Negative Number FormatThis feature will be useful if the formatting for negative numbers is not the standard minus sign in front of the number.
|
 Data FieldThis field will say which data field the current OCR zone is linked to.
|