×
Menu
Index

3.5.2.4. Data Modules Panel

3.5.2.4. Data Modules Panel
 
The Data Modules Panel have the the options to setup a Data Capture Grid to capture grid formatted data on your documents.
You can see here how to capture table formatted data from your documents.
The XLS Extract panel allows you to setup capture of XLS documents into a grid control (Only for ChronoScan Enterprise).
 
To create advanced grid capture setups create a custom data field for your grid and select the desired function from all the functions available.
 
1

Check Balance

1. Check Balance
The Check Balance button only works if the Line Capture option is selected on the Data Fields menu while creating a Job from the Job Wizard.
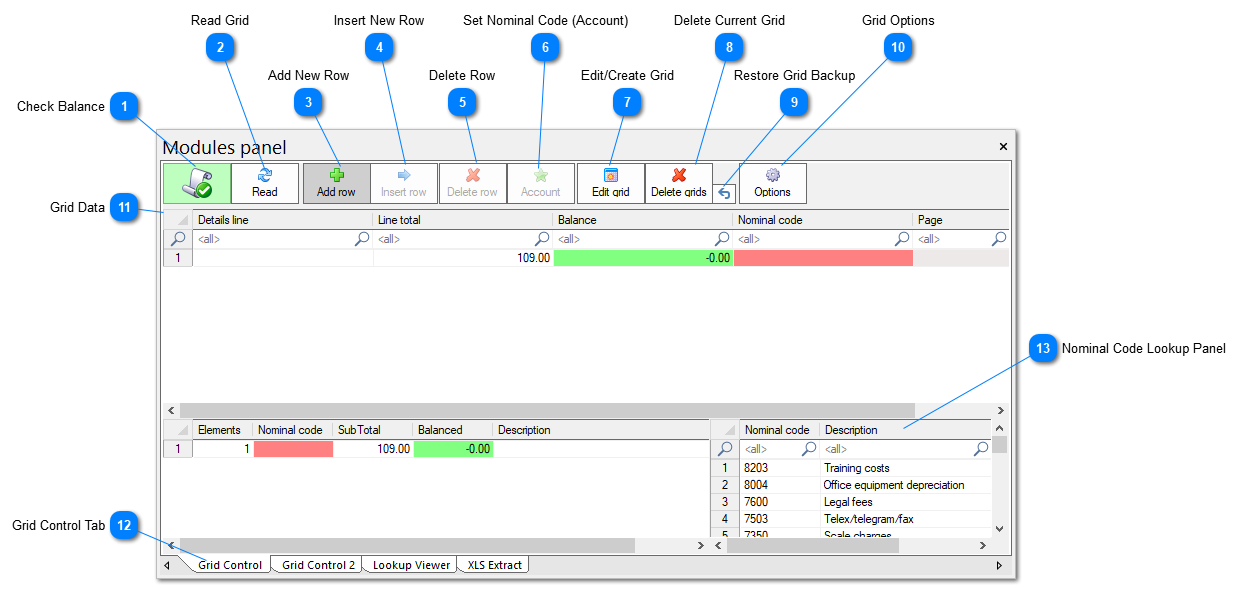
This button will make ChronoScan read the Grid and make sure the balance totals equal to the Net Total data field.
If the condition is not true ChronoScan will return an error. You can also manually setup conditions like that using VBScripting as shown here and here.
 
2

Read Grid

2. Read Grid
The Read Grid button will read the created grid and show up the results on the Modules Panel.
Use it after setting up the desired Data Grid.
 
3

Add New Row

3. Add New Row
When ChronoScan is having trouble with a Grid  you can manually add rows and edit them.
The Add New Row button will add a new row after the last row.
This option only works correctly when using the Use Fixed Row Size option while setting up the Grid Columns and Rows and will disable the automatic Data Grid settings.
 
4

Insert New Row

4. Insert New Row
When ChronoScan is having trouble with a Grid  you can manually add rows and edit them.
The Insert Row button will add a new row before the selected row.
This option only works correctly when using the Use Fixed Row Size option while setting up the Grid Columns and Rows.
 
5

Delete Row

5. Delete Row
When ChronoScan is having trouble with a Grid  you can manually add rows and edit them.
The Delete Row button will remove the selected row in the Modules Panel.
This option only works correctly when using the Use Fixed Row Size option while setting up the Grid Columns and Rows.
 
6

Set Nominal Code (Account)

6. Set Nominal Code (Account)
If you want to setup the nominal code for a specific row, you should select the row on the Grid Control tab and click on the Set Nominal Code (Account) button to assign the nominal code to the selected row.
Only useful when using Database Connections as shown here.
 
7

Edit/Create Grid

7. Edit/Create Grid
The Edit/Create Grid button will enable the "New Capture Grid" cursor and will allow the user to redraw a previously created Grid or to draw it for the first time.
Make sure the right Grid Control is selected on the Grid Control Tab.
 
8

Delete Current Grid

8. Delete Current Grid
The Delete Grids button will delete the currently selected Grid on the Grid Control tab.
 
9

Restore Grid Backup

9. Restore Grid Backup
Grid backups will be saved every time a change is made to grid position, size, columns, etc.
The backup can be restored by using the restore grid backup button.
 
10

Grid Options

10. Grid Options
The Grid Options button will open up the Grid Configuration menu.
 
11

Grid Data

11. Grid Data
After clicking on the Read button all the data that was read from the Grid will show here.
 
12

Grid Control Tab

12. Grid Control Tab
All the activated Grid Controls on the eXtra Panels Settings window will be available here on the Grid Control tabs for further editing and reading.
 
13

Nominal Code Lookup Panel

13. Nominal Code Lookup Panel
The nominal code lookup details will show up on the nominal code lookup panel.