To properly display this page you need a browser with JavaScript support.
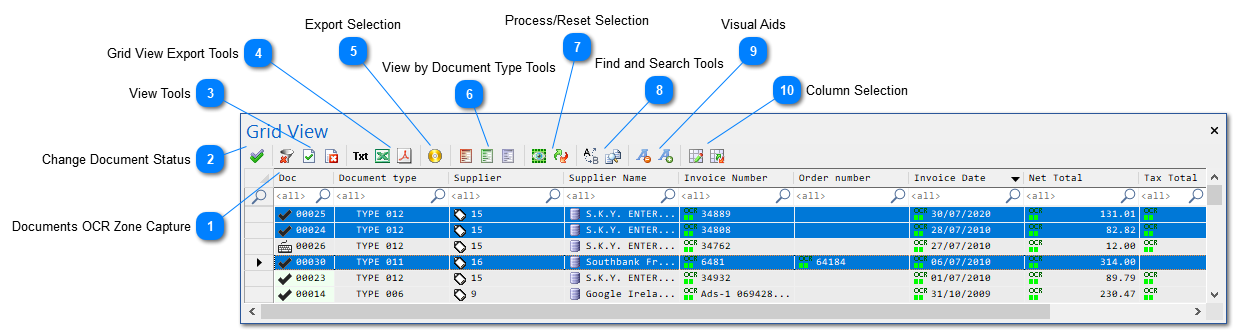
The Grid View displays the same information as the Form View, but for all the documents in the Batch. It is also possible to export the captured data as a excel or text file from the Grid View.
It is used to visualize the captured data for all the documents currently in the Batch.
Documents OCR Zone Capture This area of the Grid View displays all the data captured by the OCR Zones setup for the Job.
Then create the field around the desired data on the document.
Change Document Status This function is only available for ChronoScan Enterprise.
The document status can be set for the selected documents.
This will open the Set Document Status window.
View Tools The View Tools will hide/show only the documents that fit the selected criteria.
View All Documents
View Validated Documents
View Documents With Errors
Grid View Export Tools The Grid Export Tools allow you to quickly export only the selected data on the Grid View.
After clicking on the export button ChronoScan will prompt for the file location and will open it on the default editor for the chosen format.
Export Data in TXT Format
Export Data in XLS Format
Export Selection Select the desired documents from the Grid View while holding CRTL on your keyboard and click on Export Selection to open up the
Execute Output Window
View by Document Type Tools The View by Document Type Tools will show/hide documents based on the selected Document Type criteria.
View Only Documents With no Assigned Document Type
View Only Documents With Assigned Document Type
View Only Documents Matching the Currently Selected Document's Document Type
Process/Reset Selection Here you can either process the selected documents on the Grid View or Reset them to default.
Resetting a document to default will clear all the captured data. All OCR Zones, Grids and Triggers will remain.
Process Selection
Reset Selection to Default
Find and Search Tools The Find and Search Tools can be used to search through the captured data. It also has the Find and Replace function.
Find and Replace
Search Records With Duplicate Field Values
Visual Aids If the text size is too small or too big for your screen you can use the Visual Aid Tools to increase or decrease the text size on the Grid View.
Smaller Text Size
Bigger Text Size
Column Selection It is possible to change the columns displayed on the Grid View.
The column chooser button will open the
Field Chooser window where you can drag and drop columns to and from to hide them from the Grid View.
To hide or show a column from the Grid View just open the
Field Chooser window and drag and drop field from and to it.
Column Chooser
Reset Configuration