×
Menu
Index

3.5.2.6. Document Type Panel

3.5.2.6. Document Type Panel
 
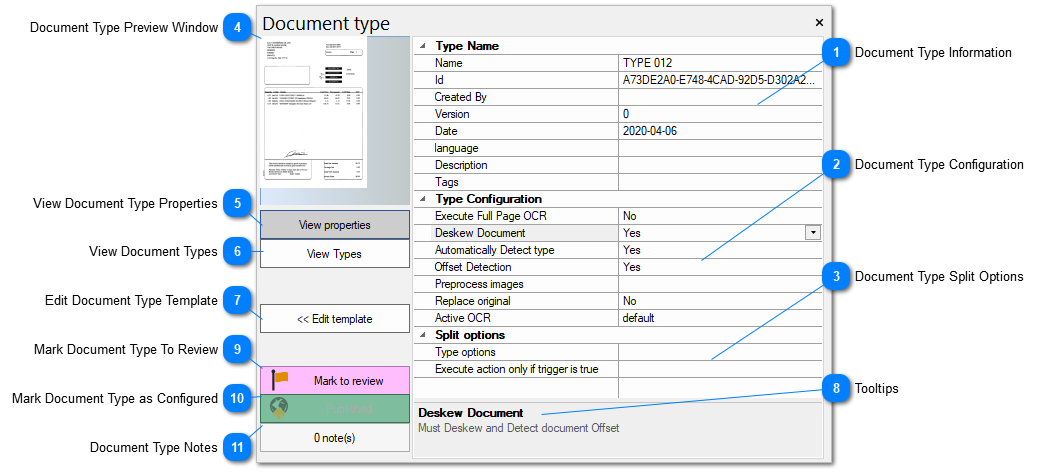
The Document Type Panel displays information about the Document Types of the selected document and the current Job. You can use this panel to edit and tweak Document Type settings for the current Job. More on Document Types here.
 
1

Document Type Information

1. Document Type Information
This section will display general information about the document type. All fields are editable.
 
2

Document Type Configuration

2. Document Type Configuration
This section displays configurations attached to the current Document Type. All fields are editable.
Offset detection will fix an issue where sometimes OCR Zones are not reading the image on the same place where they are placed.
 
3

Document Type Split Options

3. Document Type Split Options
This section displays split options attached to the current Document Type.
The options are:
 
01 - First Page
Type is set as first page.
02 - Last Page
Type is set as last page.
03 - Intermediate Page
Type is set as intermediate page.
04 - Single Page
Type is set as single page.
05 - Ignore
Same as intermediate page.
 
This is used when using subtypes to split documents.
The split can be conditioned by an OCR Trigger that can be selected from the execute action only if this trigger is true list.
 
4

Document Type Preview Window

4. Document Type Preview Window
The Document Type Preview Window displays a thumbnail for the current selected document Document Type.
 
5

View Document Type Properties

5. View Document Type Properties
The Document Type Properties View is the default view, click on the View Properties button to see the current Document Type properties on the Document Type Panel.
 
6

View Document Types

6. View Document Types
The Document Types View is documented here. Clicking the View Types button will show the Document Types View on the Document Type Panel.
 
7

Edit Document Type Template

7. Edit Document Type Template
Clicking the Edit Template button will create a new document at the end of the Batch using the currently selected document type template so you can create OCR Zones and Grids for it.
Later it can be removed.
 
8

Tooltips

8. Tooltips
The Tooltips section will display tooltips about the currently selected field.
 
9

Mark Document Type To Review

9. Mark Document Type To Review
This option is only available for ChronoScan Enterprise.
The document type status will be set to "To Review".
 
10

Mark Document Type as Configured

10. Mark Document Type as Configured
This option is only available for ChronoScan Enterprise.
The document type status will be set to "Configured".
 
11

Document Type Notes

11. Document Type Notes
Notes on the document type can be seen here.
The Notes window will open.