To open the grid menu the intended Grid Control tab should be opened on the Modules Panel, and the Edit Grid option should be enabled, the cursor will change to "New Capture Grid". Then the mouse cursor should be positioned over the grid, that will reveal the Grid Menu button. On the Grid Menu the user is presented with settings that will affect the entire grid. The user can choose to delete the Grid so it can be redrawn, to regenerate it if a complete redraw in the exact same place is intended, to select in which pages the Grid should appear and how the Grid positions itself relative to other triggers on each page.
After everything is setup, tested and is working as needed it is only a matter of going back to the Scan/Input tab and processing all the documents while enabling the Read Grid Control option.
Delete Grid
This option will remove the current drawn Grid so a new one can be redrawn.
This option should be used to reset the grid in the case of a miss edit while setting up the Grid Columns. This will redraw the current grid, resetting all the changes made.
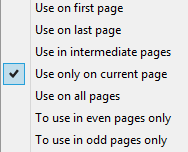
If the grid is not intended to be used only on the current page, which is the default option, this section of the Grid Menu allows to control on which pages the Grid will show up.
When the tables from which the data should be extracted moves between different pages of a multi-image document triggers can be created and/or set on the pages to make sure the Gris is always on the right place on the different pages of the document.