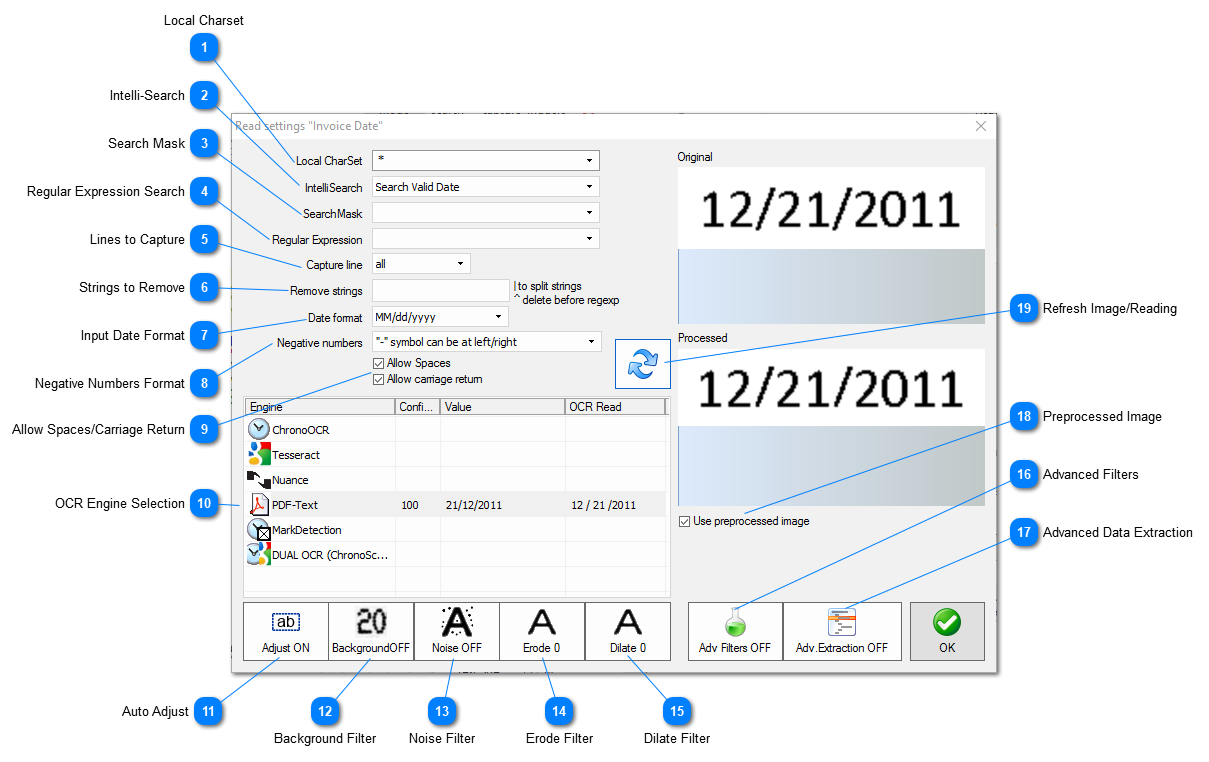
When using OCR Zones the user can set a series of advanced filters and capture options to enhance the OCR Engine capture. It is possible to capture intelli-tags, capture specific lines, run VBScripts, apply quick and advanced image filters and much more.
Local Charset
Using the Local charset option the user can restrict the characters used by the OCR Engine to perform the capture. If only numbers are used only numbers will be searched for by the OCR Engine. Very useful when common OCR problems such as "O" being detected as "0" and "1" as "I" or the other way around happen. The user can choose from the dropdown menu or manually type in all the desired characters.
Local charset options for the dropdown menu. The user can also manually type in the desired characters.
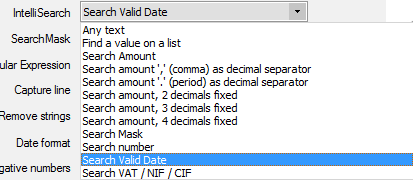
The intelli-search function will allow the user to tweak the OCR Engine algorithm to look for a specific type of data that fits one of the predefined filters. Using the intelli-search function when the data captured fits one of the predefined filters can help reduce OCR errors.
Available intelli-search filters. The default one is "Any text".
Search masks will create a template for the data being captured. Using special characters such as forward slash in combination with "A" or "D" (refer to the table below) will create a template over which the data being captured will be applied. Characters like "/" and "º" will be added to the resulting value when used on the mask. The search mask function is very useful when the data being captured must be modified by addition of special characters like "/", "\" or "-" for dates or "." and "," for amounts.
The user can create custom search masks manually or use the ones available from the drop down menu.
Using the regular expression tool it is possible to search within the captured data the desired value. This function will work great when the OCR reading is good and the user is looking for a very specific bit of data that is always formatted in a specific way.
The user can create custom regular expression or use the ones available from the drop down menu.
On this drop down menu the user can select the line or lines desired for the data capture process. To take advantage from this option Allow Carriage Return must be selected.
Strings can be removed from the captured data. Several strings can be added using "|" (pipe character) as separator. Using the "^" character will perform the Remove Strings function before the Regular Expression Search function if the latter is in use.
Having several different date formats it is possible for the user to override the default date type used by ChronoScan. By default ChronoScan will use the exact same date date format as the system date format when looking for dates. Whenever the date format on the document does not match the system format the user should change the Date Format setting to the one that fits the date format on the document. After the date capture was performed the result on the data field will be converted to the current system date format unless the user specifies a different setting.
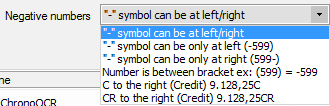
By default ChronoScan will set numbers with a "-" sign in front of them as negative numbers. Using the Negative Numbers Format setting the user can choose the right format for negative numbers for the current document type and OCR Zone. Very useful when non-standard negative number format is used.
Currently available negative numbers format options for ChronoScan.
By default ChronoScan will identify spaces between characters and carriage return (paragraph) information. Should any of those bits of information not be necessary those options can be disabled for a more accurate and easier to process OCR result.
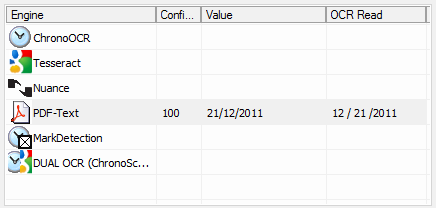
On the OCR Engine Selection box the user can quickly switch between OCR Engines for that specific OCR Zone while checking the results for each one. On the OCR Read column it is possible to read what the currently selected OCR Engine is reading from the documents and the Value column will display the final value that will be assigned to the field after all filters, validation rules and search masks have been applied.
The auto adjust filter will automatically crop the OCR Zone area trying to fit it to existing data. It can help fix problems when there is the need for a big OCR Zone for data that will vary in length.
The Background filter will try to remove background images and colors. Very useful when trying to handle data with stamps or colors in the background. The user can choose from two different algorithms, GAUSSIAN and MEAN.
Advanced data extraction can be applied to the data captured by OCR Zones. The advanced extraction options can be very useful when there is a big block of data and only a few lines or specific pieces of data should be captured. A single big OCR Zone can be created instead of several small ones.
OCR Zones can be setup to bypass the global image processing set on the Image Processing Window. By default the OCR Zone will use the image processed at global level. To change that behavior disable the "Use preprocessed image" checkbox.