To properly display this page you need a browser with JavaScript support.
×
Menu
Search
1. Table of Contents
2. Minimal System Requirements
3. Articles
3.1. Articles Table of Contents
3.2. ChronoScan Enterprise Workflow
3.2.1. Document Validation Workflow
3.3. How to backup ChronoScan Enterprise
3.3.1. Database Backup
3.3.2. Local Folder Backup
3.4. Masterkey Setups Guide
3.4.1. Converting an Existing Setup to Use Masterkeys
3.5. Capturing Checkboxes and Signature Boxes
3.6. ChronoScan Enterprise Network Diagram
3.7. Adding Users in Bulk
4. Installation of ChronoScan Web Server
4.1. 1. Software Prerequisites
4.2. 2. Step by Step Installation Guide
4.2.1. WCI SQLServer Database Creation
4.2.2. User Access Recommendations
4.3. 3. Running the ChronoScan Main Services
4.3.1. Running Services for Multiple Configurations
4.3.2. Running a ChronoScan Server with SSL
4.3.2.1. Generating Self Signed Test Certificates with OpenSSL
4.3.2.2. Converting Pfx files to wt pem format
4.3.3. Configuration of Additional Processing Servers
4.4. Optimizing You Master Vendor Database
4.5. Database Parameters
4.6. Running ChronoScan Web Server through a Reverse Proxy (IIS)
4.7. Running ChronoScan Web Server through a Reverse Proxy (Helicon APE)
4.8. Using Service Availability Monitoring Tools
5. ChronoScan Web Administrator introduction
5.1. Table of Contents
5.2. ChronoScan Web Main Services Description
5.3. User Roles
5.3.1. User variables
5.3.2. User Permissions
5.4. Jobs & Batches
5.5. Document Types (Document Templates)
5.6. Entities
5.7. Data model templates
5.8. Main Workflow Stages
5.8.1. Document\Batch Creation
5.8.1.1. Batch Creation
5.8.1.2. Installing the Scan Plug-In
5.8.2. Document Pre-Classification
5.8.3. Document Processing
5.8.4. Document Post-Classification
5.8.5. Document Type (Template) Configuration
5.8.5.1. Grid Setup
5.8.5.1.1. Grid Properties
5.8.5.1.2. Column Menu (Master Column)
5.8.5.1.2.1. Advanced OCR for Grid - Data Capture Options
5.8.5.1.2.1.1. Advanced OCR for Grid - OCR Engine Options
5.8.5.2. Trigger Setup
5.8.5.3. Intelli-Tag Setup
5.8.5.4. OCR Zones Setup
5.8.5.4.1. Advanced OCR Reading - Data Capture
5.8.5.4.1.1. Advanced OCR Reading - OCR Engine
5.8.5.4.1.2. Advanced OCR Reading - Linked Triggers
5.8.5.4.1.3. Advanced OCR Reading - Advanced Data Extraction
5.8.6. Batch Indexing
5.8.6.1. Status Icons and Description
5.8.6.2. Data Fields Panel
5.8.6.2.1. Intelli-tag Settings
5.8.6.2.2. Document and Field Settings
5.8.6.3. Grid View
5.8.6.4. Pending Tasks and Document Navigator
5.8.6.5. Keyboard shortcuts
5.8.6.6. Grid Panel
5.8.7. Data Review/Correction
5.8.8. Final approval stage
5.8.8.1. The approval view
5.8.8.2. Export modules for approval workflow Jobs
5.8.9. Document Export
5.9. Notifications
5.10. Web Session Timeout
6. Users Guide - Administrator
6.1. Table of Contents
6.2. Login Window
6.3. Documents Tab
6.3.1. Default Filter Creation
6.3.2. Custom Fields for Documents Reports
6.3.3. History Window
6.4. Batches Tab
6.4.1. Batch Status
6.5. Jobs Tab
6.5.1. Job Settings
6.5.1.1. Configuration
6.5.1.2. Workflow
6.5.1.3. Users
6.5.1.4. Fields
6.5.1.5. Master Keys
6.5.1.6. Document Types
6.5.1.6.1. Set All Existing Document Types as Validated
6.5.1.7. XLS Types
6.5.1.8. Notifications
6.5.1.9. Input
6.5.1.9.1. Hotfolder Automated Input
6.5.1.9.2. IMAP Automated Input
6.5.1.9.2.1. New IMAP Account Window
6.5.1.9.2.2. E-mail Input Rules Window
6.5.1.10. Processing Options
6.5.1.11. Data Entry and Error Correction Options
6.5.1.12. Export Options
6.5.1.13. Stats
6.6. Users Tab
6.6.1. Create New User
6.6.2. Assign Entities to User
6.7. Entities Tab
6.8. Templates Tab (XSD's)
6.9. Reports
6.9.1. Reports 1
6.9.2. Reports 2
6.9.3. Notifications
6.9.4. Processed AP Reports
6.10. Administration Tab
6.11. Description of Status Icons
6.12. Batches Labeling system
7. Users Guide (Operators and Editors)
7.1. Dashboard
7.2. Documents Tab
7.3. Batches Tab
7.4. Manual Batch Creation
7.4.1. Document Scanning
7.4.2. Document Uploading
7.4.2.1. PDF Uploading Options
7.5. Batches Indexing
7.5.1. Data Input Panel
7.5.1.1. Supplier Data View
7.5.1.2. Intelli-Tags View
7.5.1.2.1. Intelli-Tag Settings Window
7.5.1.3. Masterkey Settings
7.5.1.4. Triggers Panel
7.5.2. Data Grid View
7.5.3. Thumbnail View
7.5.4. Document Notes Window
7.5.4.1. Attaching and importing files from the Document notes window
8. Users Guide (Indexer)
8.1. Dashboard
Search
Search
Search
Search
7. Users Guide (Operators and Editors)
7.5. Batches Indexing
7.5.2. Data Grid View
Previous page
Next page
Print version
To properly display this page you need a browser with JavaScript support.
7.5.2. Data Grid View
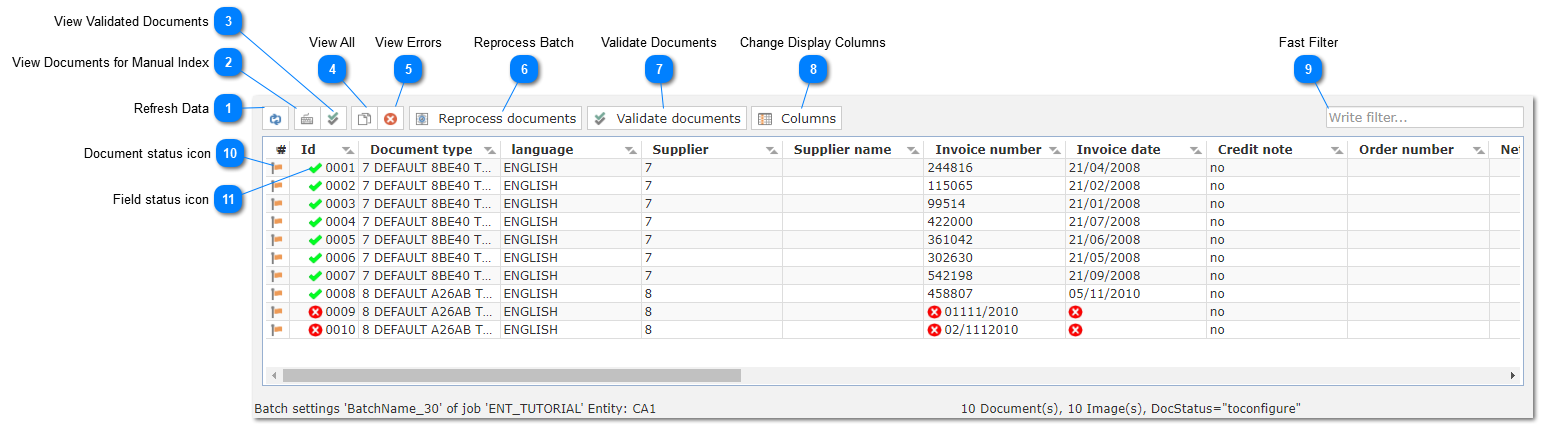
The Data Grid view will display all the data captured on the documents for the current batch.
Using the Grid View the user can quickly have access to all of the documents and the data captured.
It is also possible to manually change the values for each document by typing directly on the Data Grid view.
Refresh Data
Click here to refresh the data on the grid view.
Top
View Documents for Manual Index
Click here to view only the documents that need manual indexing (validation or error correction).
Top
View Validated Documents
Click to view only validated documents.
Top
View All
Click on the View All button to remove all filters.
Top
View Errors
Click here to view only documents with errors.
Top
Reprocess Batch
Click on this button to reprocess the entire Batch.
Use with care on big Batches as this will interrupt the workflow until reprocessing is finished.
Top
Validate Documents
This button will validate all selected documents or all document if no documents are selected.
Top
Change Display Columns
Use this button to display only the desired data fields on the Grid View.
Very useful when checking only part of the data captured.
Top
Fast Filter
Use the Fast Filter to execute any desired custom search.
This will perform the search on all of the data fields and documents.
Top
Document status icon
The icons on the first column of the Data Grid View will give some insight into each document.
Top
Field status icon
Shows fields with errors.
Place mouse cursor over the icon to get extended error info.
Top