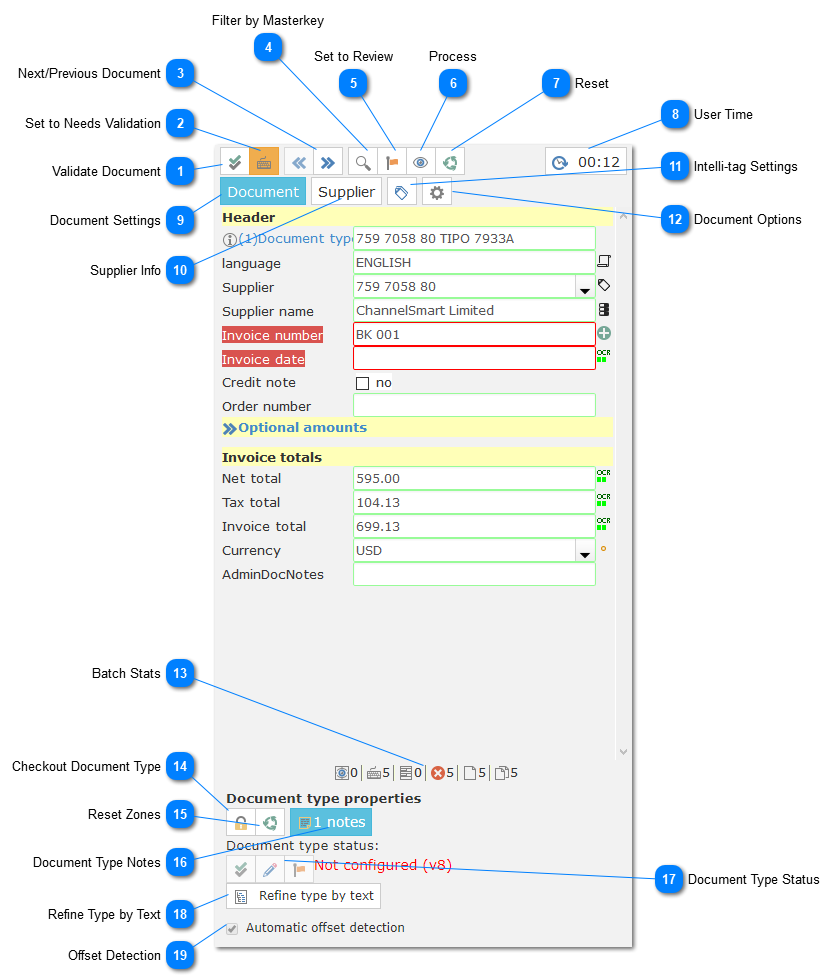
5.8.6.2. Data Fields Panel
On the Data Fields Panel the user can check all the data captured and change it. It is also possible to change intelli-tag, supplier and masterkey settings.
The user will also be able to reprocess or reset the document and set the document type status.
 Validate DocumentClick on the validate document button to set the validated status to the current and move to the next document on the Batch.
|
 Set to Needs ValidationSet the status of the current document to await for validation.
|
 Next/Previous DocumentMoves between all the documents on the Batch.
|
 Filter by MasterkeyThis will sort the documents by masterkey and filter them on a separate window.
|
 Set to ReviewSet the status of the document to await for review.
This will set the document type of the current document type to "to configure".
Use this when you identify an issue with the document type that you can't fix.
|
 ProcessThe process button will process the current document.
|
 ResetThis button will reset all the data captured on the document.
Very useful when testing out new configurations.
It is good practice to reset the document when changes are made to the document type.
|
 User TimeThis clock will note the time each user spends on each document.
|
|
The document settings button will open the default data fields view.
|
 Supplier InfoThe supplier info button will open the panel with information about the supplier for the current document.
It will also allow to create and/or change the data for the currently detected supplier.
|
 Intelli-tag SettingsThe intelli-tag settings button will open the intelli-tag settings where the user can manage all intelli-tags.
|
 Document OptionsThe document options button will open the settings for the supplier (masterkey) for the current document as well as other general options.
|
 Batch StatsThis area will show Batch statistics.
|
 Checkout Document TypeThe checkout document type button will allow users with editor privileges to lock/unlock a document type for editing.
|
 Reset ZonesThe reset zones button will reset all the OCR Zones for the current document type.
|
 Document Type NotesThe document type notes will indicate any notes created for the current document type.
This button can also be used to create and manage notes for the current document type.
|
 Document Type StatusThe status for the current document type can be set with the document type status buttons.
Please note that first the document type must be unlocked with the checkout button.
|
|
Set status to "configured"
|
|
|
Set status "to configure"
|
|
|
Set status "to review"
| Configured: The document type is setup correctly.
To Configure: The document type needs to be setup by a user.
To Review: The document type contain errors and need to be reviewed.
|
 Refine Type by TextThe refine type by text button will allow the user to create an OCR Trigger that will set the document type for the current document.
This will be very useful when the wrong document type is being detected by ChronoScan.
|
 Offset DetectionThe automatic offset detection can be disabled when OCR Zones present the wrong behavior by capturing the image on the wrong place.
When you see the OCR Zone is not reading the designated area correctly try turning off automatic offset detection.
|