4.3. 3. Running the ChronoScan Main Services
After installation and setup is complete follow this guide to install the ChronoScan Enterprise Services.
All of the ChronoScan services can be executed as regular executables for installation/debug purposes or as a Windows Service for a production environment.
If you have the need to process multiple batches of documents at the same time to reduce the overall turnaround time you can use additional machines with ChronoScan Enterprise by configuring additional processing servers.
1 - Creating the services from the command prompt:
-
ChronoScan Processing Server:
-
Open a command line and execute:
-
SC Create "WCI_PROCESSING_SERVER" binPath= "\"c:\Program files (x86)\ChronoScan\Bin\chrono_proc_server.exe\""
-
ChronoScan Input Server (only if you're using automated input services):
-
Open a command line and execute:
-
SC Create "WCI_IMPORT_SERVER" binPath= "\"c:\Program files (x86)\ChronoScan\Bin\chrono_input_server.exe\""
-
ChronoScan Export Server:
-
Open a command line and execute:
-
SC Create "WCI_EXPORT_SERVER" binPath= "\"c:\Program files (x86)\ChronoScan\Bin\chrono_out_server.exe\""
-
ChronoScan Web Server:
-
Open a command line and execute:
-
SC Create "WCI_WEB_SERVER" binPath= "\"c:\Program files (x86)\ChronoScan\Bin\chrono_wci.exe\""
1.1 - Deleting the created services:
To remove the service from the system use the following code:
SC Delete "WCI_PROCESSING_SERVER"
SC Delete "WCI_IMPORT_SERVER"
SC Delete "WCI_EXPORT_SERVER"
SC Delete "WCI_WEB_SERVER"
1.2 - Running the Servers as executables from the command prompt:
If you want to run the services as executables, for testing and troubleshooting purposes, use the following commands:
-
ChronoScan Processing Server:
-
Open a command line, move to the %installdir%\ChronoScan\Bin directory and execute:
-
chrono_proc_server -runasexe to use the processing service as an executable.
-
ChronoScan Input Server (only if you're using automated input services):
-
Open a command line, move to the %installdir%\ChronoScan\Bin directory and execute:
-
chrono_input_server -runasexe to use the processing service as an executable.
-
ChronoScan Export Server:
-
Open a command line, move to the %installdir%\ChronoScan\Bin directory and execute:
-
chrono_out_server -runasexe to use the processing service as an executable.
-
ChronoScan Web Server:
-
Open a command line, move to the %installdir%\ChronoScan\Bin directory and execute:
-
chrono_wci -runasexe to use the processing service as an executable.
2 - Changing the setting for the Services:
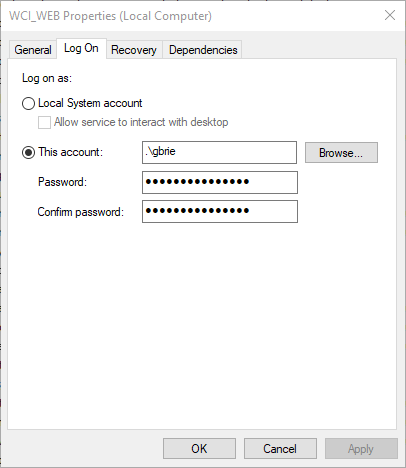
After the services are created open the Windows Services window by using Windows Key + R to launch the run dialogue and then type services.msc.
On the Services window look for the created WCI Server services, open the properties and change Startup type to Automatic and, on the Log On tab, select This account and set the appropriate user for the service:
 |
|
Log On tab on the Service properties for the ChronoScan Web Server service.
|
For user access we recommend creating a ChronoScan service account on AD. That same user must also have access to the database created on step 2.
This user must have read and write access to the entire structure inside C:\ProgramData\ChronoScan and C:\Program Files (x86)\ChronoScan.
NOTE: Please Make sure the Web Server Service is running so you have access to the Web Interface.
3 - Service creation example from powershell:
If you want to use PowerShell instead to create the services, follow these commands:
-
PS> sc.exe Create "WCI_PROCESSING_SERVER" binPath= 'C:\Program Files (x86)\ChronoScan\Bin\chrono_proc_server.exe' displayname= "ChronoScan Processing Server"
-
PS> sc.exe Create "WCI_INPUT_SERVER" binPath= 'C:\Program Files (x86)\ChronoScan\Bin\chrono_input_server.exe' displayname= "ChronoScan Input Server"
-
PS> sc.exe Create "WCI_EXPORT_SERVER" binPath= 'C:\Program Files (x86)\ChronoScan\Bin\chrono_out_server.exe' displayname= "ChronoScan Export Server"
-
PS> sc.exe Create "WCI_WEB_SERVER" binPath= 'C:\Program Files (x86)\ChronoScan\Bin\chrono_wci.exe' displayname= "ChronoScan Web Server"
4 - Default settings for the servers:
Those are the default settings for all servers. To use different ports refer to
Running Services for Multiple Configurations
:
Service NameDefault portLog directorychrono_input_server.exe9007C:\ChronoScanLog\chrono_input_server.exechrono_proc_server.exe9008C:\ChronoScanLog\chrono_proc_server.exechrono_out_server.exe9009C:\ChronoScanLog\chrono_out_server.exechrono_wci.exe10000C:\ChronoScanLog\chrono_wci.exePort 10000 is usually open to the network on the firewall, the rest of the ports are only for administration and intercommunication of the services.Create the log directory if you want to get an extended activity log for problem reporting and system debug.Do not use the log folders while on production.NOTE: If you have trouble connecting to the server using the Web Interface please don't forget to add a firewall exception on the host machine.ChronoScan Server running as executable: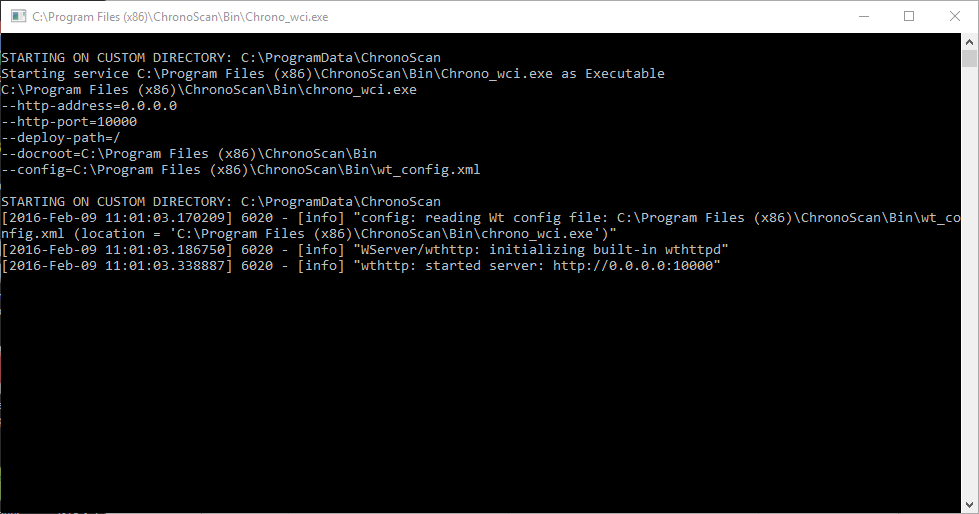
Running Multiple Configurations
If you need to run multiple configurations you can follow through the Running Services for Multiple Configurations guide.
After the services are created and running correctly ChronoScan Enterprise is ready to start receiving and processing documents.