×
Menu
Index

3.5.5.3.2. External Data Import Window

3.5.5.3.2. External Data Import Window
 
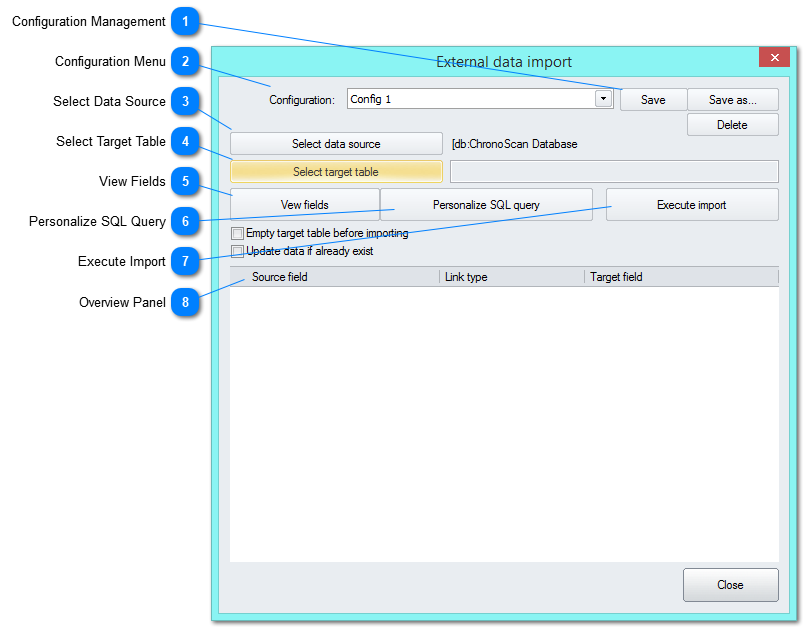
On the External Data Import Window you can setup the data and how it will be imported into ChronoScan from a database. It can be used to fill in Data Fields and to create Intelli-Tag Lists. You also can select whether the target table on ChronoScan is cleaned up before importing or the data is just updated if it already exists.
 
1

Configuration Management

1. Configuration Management
After setting up all the desired settings click on the Save or Save As button to save the current configuration to use it again later. Click on the Delete button to remove the currently selected Configuration.
2

Configuration Menu

2. Configuration Menu
On this menu you can select the desired configuration. By default it is empty, enter the desired settings and click on the Save As button to save the configuration with the desired name.
3

Select Data Source

3. Select Data Source
Click on the Select Data Source button to open up the Database Navigator Window where you can select the desired data to be imported into ChronoScan.
4

Select Target Table

4. Select Target Table
The Select Target Table button will open the Database Navigator Window where you can select the desired table to import data from.
5

View Fields

5. View Fields
After selecting the desired table using the Select Target Table button click on the View Fields button to view the fields from that table on the Database Navigator Window.
6

Personalize SQL Query

6. Personalize SQL Query
Click on the Personalize SQL Query to open the Edit SQL window where you can edit your SQL Query.
 
Edit SQL window.
 
7

Execute Import

7. Execute Import
Click on the Execute Import button to start importing the data from the database into ChronoScan.
8

Overview Panel

8. Overview Panel
On the Overview Panel you can see all the information and how it will be imported.